

Install and running Vagrant is in general pretty straightforward. For a non-Linux user, it can get a little bit tricky when combining Vagrant with the Windows Subsystem for Linux (WSL). Even when you got the installation right, there are still some stumbling blocks waiting for you when you try to run Ansible Playbooks during vagrant up.
Vagrant is really helpful when you want to setup a predefined, always the same environment to run some tests or to develop on. Vagrant uses so called Boxes which can be seen like Docker Images, just as VMs. You can describe them in a Ruby styled way and deploy even a multi-VM environment with a simple configuration file and by running vagrant up.
1. Prerequisites
- Windows 10/11
- VirtualBox - version +6.1.22 (Windows version)
- WSL 2
- Vagrant +2.2.18 (Linux version)
- Vagrant plugin: virtualbox_WSL2
- (maybe) PowerShell or Pwsh
2. What is Vagrant ?
Vagrant is designed for everyone as the simplest and fastest way to create a virtualized environment
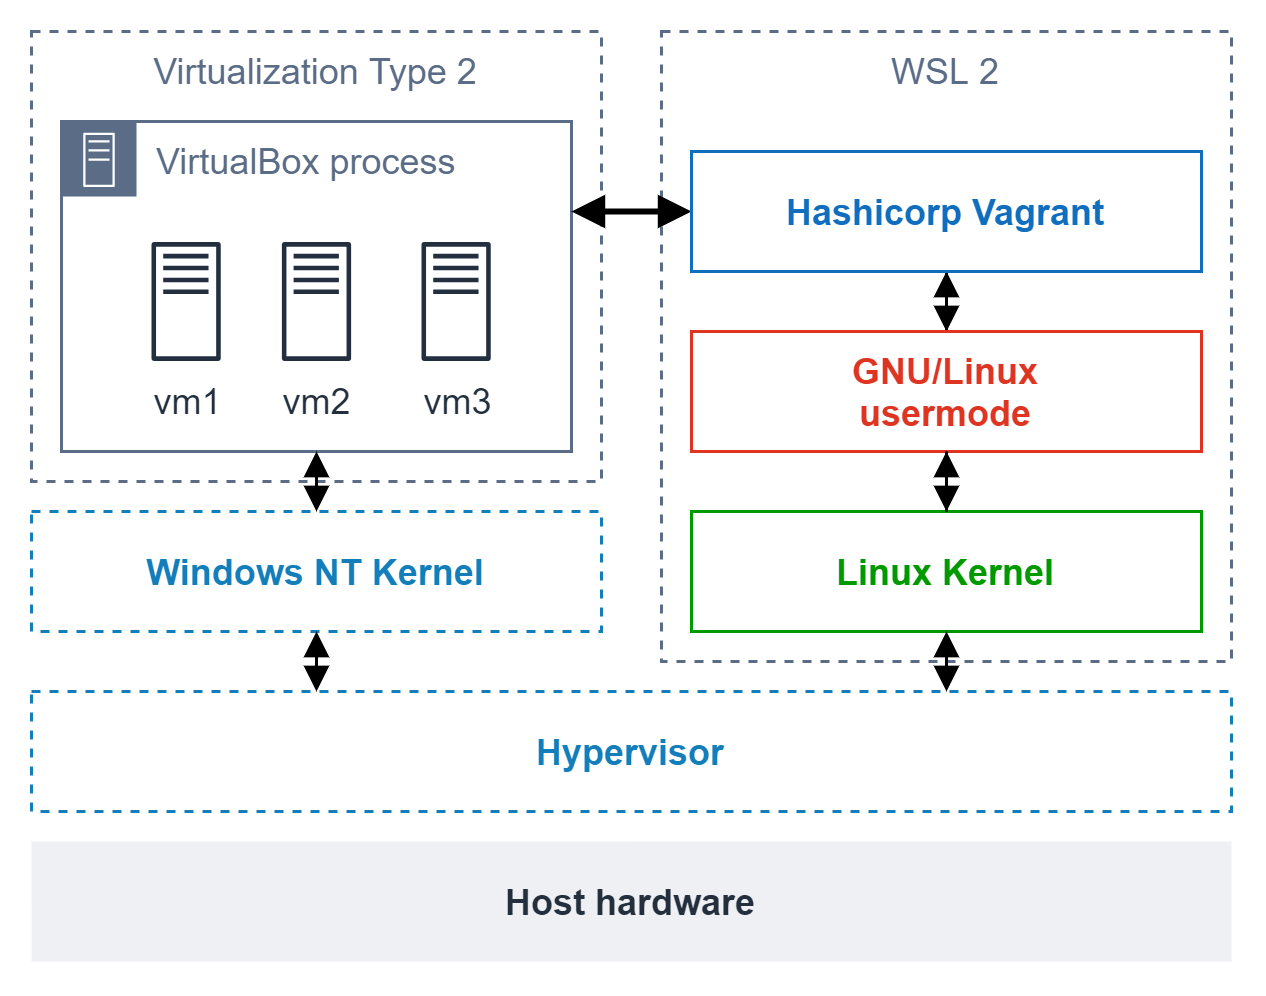
The most important thing to mention:
VirtualBox must be installed on Windows. Windows will handle the VirtualBox process which will create the VM through the Virtualization.
Vagrant must be installed on Linux (WSL 2). The Linux binary is required because the Windows version is not compatible with WSL 2.
3. How to Install ?
Download: https://developer.hashicorp.com/vagrant/downloads
Download VirtualBox: https://www.virtualbox.org/wiki/Downloads
1
2
3
curl -fsSL https://apt.releases.hashicorp.com/gpg | sudo apt-key add -
sudo apt-add-repository "deb [arch=amd64] https://apt.releases.hashicorp.com $(lsb_release -cs) main"
sudo apt-get update && sudo apt-get install vagrant
Then, as the final move, you have to put some additional environment variables in you WSLs profiles (e.g. .bashrc or .zshrc, depending on which shell you use).
Attention: Please adjust the path to your user home and the Virtualbox installation to your setup!
1
2
3
4
5
echo 'export VAGRANT_WSL_ENABLE_WINDOWS_ACCESS="1"' >> ~/.bashrc
echo 'export VAGRANT_WSL_WINDOWS_ACCESS_USER_HOME_PATH="/mnt/c/Users/username/"' >> ~/.bashrc
echo 'export PATH="$PATH:/mnt/c/Programs/Virtualbox"' >> ~/.bashrc
# now reload the ~/.bashrc file
source ~/.bashrc
VAGRANT_WSL_ENABLE_WINDOWS_ACCESS: Enables Vagrant to use Features that are installed on your Windows client and not within WSL. So for instance Virtualbox itself will then get used from the Windows Client installation and not presuming it is installed within your WSL.
VAGRANT_WSL_WINDOWS_ACCESS_USER_HOME_PATH: Path to your user home directory from within WSL. Adjust the entry to your configuration (so username).
PATH: Add the Virtualbox installation path of Virtualbox to your PATH environment variable.
When running vagrant -v, your output should look something like this:
1
2
vagrant --version
Vagrant 2.4.1
Since September 2021 vagrant starts to fail with an error like this one
1
2
3
4
5
6
7
8
9
10
11
12
13
14
15
16
17
18
19
20
Bringing machine 'default' up with 'virtualbox' provider...
==> default: Checking if box 'hashicorp/bionic64' version '1.0.282' is up to date...
==> default: Clearing any previously set forwarded ports...
==> default: Clearing any previously set network interfaces...
==> default: Preparing network interfaces based on configuration...
    default: Adapter 1: nat
==> default: Forwarding ports...
    default: 22 (guest) => 2222 (host) (adapter 1)
==> default: Booting VM...
==> default: Waiting for machine to boot. This may take a few minutes...
    default: SSH address: 127.0.0.1:2222
    default: SSH username: vagrant
    default: SSH auth method: private key
    default: Warning: Connection refused. Retrying...
    default: Warning: Connection refused. Retrying...
    default: Warning: Connection refused. Retrying...
    default: Warning: Connection refused. Retrying...
    default: Warning: Connection refused. Retrying...
    default: Warning: Connection refused. Retrying...
==> default: Waiting for cleanup before exiting...
So install virtualbox_WSL2 plugin
1
vagrant plugin install virtualbox_WSL2
And set up Network /etc/vbox/networks.conf
1
2
3
cat /etc/vbox/networks.conf
* 10.0.0.0/8 192.168.0.0/16
* 2001::/64
Finally restarted WSL from within an elevated Powershell
1
Restart-Service -Name "LxssManager"
4. Using Vagrant
You can find some Vagrantfiles in repository. For Example:
1
2
3
4
5
6
7
8
9
10
11
12
13
14
15
16
17
18
19
Vagrant.configure("2") do |config|
    # General configuration
    config.vm.box = "generic/ubuntu2004"
    config.ssh.insert_key = false

    config.vm.provider :virtualbox do |v|
        v.memory = 512
        v.linked_clone = true
    end

    # VM configuration
    config.vm.define "ubuntu2004" do |ubuntu2004|
        ubuntu2004.vm.hostname = "ansible"
    end

    config.vm.provision "ansible" do |ansible|
        ansible.playbook = "playbook.yml"
    end
end
We will create a (really minimal) Ubuntu VM with this Vagrantfile. The last section is interesting, here we control which Ansible Playbook we want to run after the VM was deployed. Let’s say we want to setup an Apache Webserver using an Ansible Playbook. So create a playbook.yml with the following content alongside your Vagrantfile.
1
2
3
4
5
6
7
8
9
10
11
---

- hosts: "all"
  become: true

  tasks:
  - name: Install apache2
    apt:
      name: apache2
      update_cache: true
      state: latest
Expose result
1
2
3
4
5
6
7
8
9
10
11
12
13
14
15
16
17
18
19
20
21
22
23
24
25
26
27
28
29
30
31
32
33
34
35
36
37
38
39
40
41
42
43
❯ vagrant up
Bringing machine 'ubuntu2004' up with 'virtualbox' provider...
==> ubuntu2004: Cloning VM...
==> ubuntu2004: Matching MAC address for NAT networking...
==> ubuntu2004: Checking if box 'generic/ubuntu2004' version '3.6.8' is up to date...
==> ubuntu2004: Setting the name of the VM: ansible_ubuntu2004_1645361591133_80968
==> ubuntu2004: Fixed port collision for 22 => 2222. Now on port 2200.
==> ubuntu2004: Clearing any previously set network interfaces...
==> ubuntu2004: Preparing network interfaces based on configuration...
    ubuntu2004: Adapter 1: nat
==> ubuntu2004: Forwarding ports...
    ubuntu2004: 22 (guest) => 2200 (host) (adapter 1)
    ubuntu2004: 22 (guest) => 2200 (host) (adapter 1)
==> ubuntu2004: Running 'pre-boot' VM customizations...
==> ubuntu2004: Booting VM...
==> ubuntu2004: Waiting for machine to boot. This may take a few minutes...
    ubuntu2004: SSH address: 172.27.163.177:2200
    ubuntu2004: SSH username: vagrant
    ubuntu2004: SSH auth method: private key
    ubuntu2004: Warning: Connection reset. Retrying...
    ubuntu2004:
    ubuntu2004: Vagrant insecure key detected. Vagrant will automatically replace
    ubuntu2004: this with a newly generated keypair for better security.
    ubuntu2004:
    ubuntu2004: Inserting generated public key within guest...
    ubuntu2004: Removing insecure key from the guest if it's present...
    ubuntu2004: Key inserted! Disconnecting and reconnecting using new SSH key...
==> ubuntu2004: Machine booted and ready!
==> ubuntu2004: Checking for guest additions in VM...
==> ubuntu2004: Setting hostname...
==> ubuntu2004: Running provisioner: ansible...
    ubuntu2004: Running ansible-playbook...

PLAY [all] *********************************************************************

TASK [Gathering Facts] *********************************************************
ok: [ubuntu2004]

TASK [Install apache2] *********************************************************
changed: [ubuntu2004]

PLAY RECAP *********************************************************************
ubuntu2004                 : ok=2    changed=1    unreachable=0    failed=0    skipped=0    rescued=0    ignored=0
5. References
- VirtualBox download page https://www.virtualbox.org/wiki/Downloads
- Vagrant Quick Start tutorial https://learn.hashicorp.com/tutorials/vagrant/getting-started-project-setup?in=vagrant/getting-started
- Vagrant and Windows Subsystem for Linux https://www.vagrantup.com/docs/other/wsl
- Install WSL 2 on Windows 10 https://www.thomasmaurer.ch/2019/06/install-wsl-2-on-windows-10/
- Connection Refused in Vagrant using WSL 2 https://stackoverflow.com/questions/65001570/connection-refused-in-vagrant-using-wsl-2
- Karandash8/virtualbox_WSL2 https://github.com/Karandash8/virtualbox_WSL2
Comments powered by Disqus.