
Ansible Kubernetes Cluster Centralization 1.28.X
Note: this is an installation tool, not a tool to fix the application. Disclaimer, if you have tried it, please donate to make up for your mistakes.
1. Introduction
If you have eyes, please read the content of this section :D
- Donate: Give Me Coffee $10
Donate to read my good articles or projects in advance, and practical knowledge that you will encounter in life.
I accept 1-1 tutoring via telegram, if you want to become an expert engineer in IT.
2. Stack Community
- Vagrant: A single vagrant up command will create VMs.
- Ansible: An open source IT automation engine.
- Container: An industry-standard container runtime.
- Kubernetes: An open-source system for automating deployment, scaling, and management of containerized applications.
- CNI: An open source networking and network security solution for containers include(flannel,calico,cilium…).
- MetalLB: A bare metal load-balancer for Kubernetes.
- Nginx: An Ingress controller v0.14.0
- Etcd v3.3.4
- Helm Charts v2.9.1
- Prometheus v2.3.2
- Velero latest
3. Requirements
- The cluster requires at least 4 servers, bare-metal or virtual, with Ubuntu 20.04 LTS X installed.
- All servers are in the same network and able to see each other.
- An Ansible Server has to be setup in the same network with Ansible v2.4 (or later) and python-netaddr installed.
- Internet access is available for all servers to download software binaries.
- Password-less SSH has to be enabled for the root user on all servers except the Ansible Server
- Root user remote login has to be enabled on all servers except the Ansible Server.
Make sure that your VMs installed and your SSH key is already installed on the machines
1
2
3
4
5
6
7
8
9
10
11
12
13
master1 | SUCCESS => {
    "changed": false,
    "ping": "pong"
}
worker1 | SUCCESS => {
    "changed": false,
    "ping": "pong"
}
...
storage1 | SUCCESS => {
    "changed": false,
    "ping": "pong"
}
3.1 Not require
- VirtualBox: This tutorial leverages the VirtualBox to streamline provisioning of the compute infrastructure required to bootstrap a Kubernetes cluster from the ground up. Click to download and install VirtualBox.
- Cloud: Using service Cloud like Amazon EC2, GCP, Bizfly …
Use Vagrant to manage virtual machine resources, and use the vagrant-hosts plug-in to manage the /etc/hosts file in the virtual machine.
1
vagrant plugin install vagrant-hosts
output ==> Read more
1
2
3
4
Installing the 'vagrant-hosts' plugin. This can take a few minutes...
Fetching rake-13.2.1.gem
Removing rake
Successfully uninstalled rake-13.2.1
4. File Structure
The code used to create a Kubernetes Cluster with Vagrant and Ansible is composed of version old
1
2
3
4
5
6
7
8
9
10
11
12
13
14
15
16
17
├── Vagrantfile       # Definitions of the machines
├── group_vars        # Variable overrides
├── inventory         # Host information files
├── playbook.yml      # Main deployment file
├── roles             # Interdependent roles
│   ├── cni           # Network plugin Calico, Flannel and Cilium configuration
│   ├── common        # Installation of required packages for Kubernetes
│   ├── container     # Container installation (Docker and Containerd)
│   ├── ingress-nginx # Ingress controller installation using NGINX
│   ├── certs         # Storage Certs from generate and sync certs
│   ├── kubernetes    # Kubernetes master and worker configuration
│   ├── loadbalancer  # Load balancer basae on Nginx, Haproxy, Keep-alived
│   ├── etcd          # ETCD internal and external for bare metal Kubernetes clusters
│   ├── metallb       # MetalLB load-balancer for bare metal Kubernetes clusters
│   ├── velero        # Velero, tools support backup and restore alternative etcd
│   └── nfs           # NFS installation for file sharing (Kubernetes)
└── setup             # Information for virtual server initialization
5. Quick Start
To start setting up a stable Cluster system for yourself, set it up with the following tasks.
5.1 Edit the values of the default variables to your requirements
1
File: group_vars/all
Modify variables
| Active variable | Options default: false |
| active_ha_vip | true/false -> active VIP for haproxy, nginx |
| active_cluster_ha | false -> active instance standalone kubernetes for only master |
| active_cluster_ha | true -> active instance distribute kubernetes for multi master internal |
| active_dis_int | true -> active instance distribute kubernetes for multi master external (pods) |
| active_dis_ext | true -> active instance distribute kubernetes for multi master external (service) |
5.2 Edit the Ansible inventory file to your requirements
1
File: inventory/hosts.ini
Modify hosts
1
2
3
4
5
6
7
[nfs_server]    -> groups NFS Clien and NFS Server
[etcd]          -> groups that defines etcd-in and etcd-out
[loadbalancer]  -> groups that defines haproxy
[cluster]       -> depend on groups master and worker
[master]        -> groups that defines master nodes
[worker]        -> groups that defines worker nodes
[vip]           -> depend on groups loadbalancer
5.3 Validate host and user
1
ansible-playbook -i inventory/hosts.init playbook.yml --tags checking-hosts
For example

6. Run Ansible Playbooks
Require Modify Variables and Hosts before run :D
Command: ansible-playbook -i inventory/hosts.init playbook.yml
6.1 Active Kubernetes Single
Let’s modify variable active active_cluster_ha=false: Run ansible playbook with tags.
1
common,containerd,k8s,k8s-init,join-worker
6.2 Active Kubernetes Cluster
For Cluster. If using VIP, please enable active active_ha_vip=true and modify groups in hosts
- Tags: keepalived
When active active_cluster_ha=true: Run ansible playbook with tags.
1
haproxy,common,containerd,k8s,k8s-init,join-master,join-worker
When active (pods) active_dis_int=true: Run ansible playbook with tags.
1
haproxy,common,containerd,k8s,cfssl,gen-certs,sync-certs,etcd-init,etcd-in,k8s-init,join-master,join-worker
When active (service) active_dis_ext=true: Run ansible playbook with tags.
1
haproxy,common,containerd,k8s,cfssl,gen-certs,sync-certs,etcd-init,etcd-out,k8s-init,join-master,join-worker
Reference More
7. Kubernetes Single Network Overview
Using Tools Vagrant for LAB (not necessarily read)
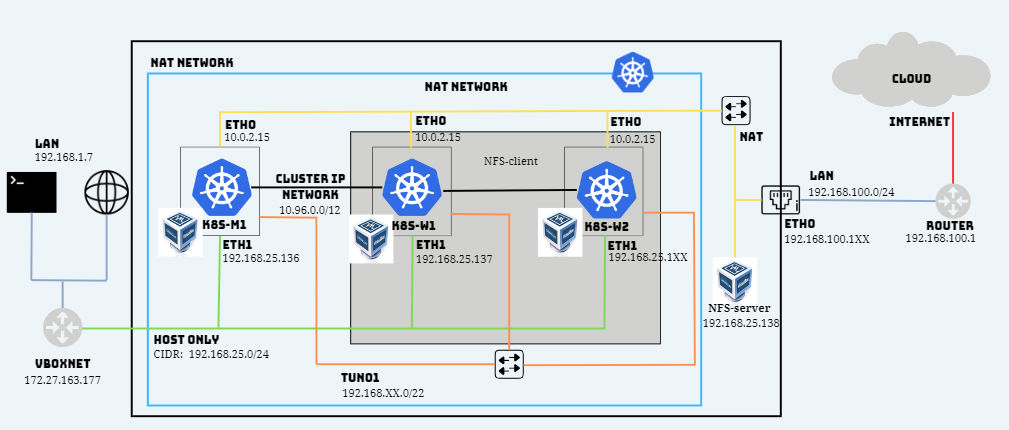
7.1 Kubernetes External IPs Vagrant
The VirtualBox HOST ONLY network will be the network used to access the Kubernetes master and nodes from outside the network, it can be considered the Kubernetes public network for our development environment. In the diagram, it is shown in green with connections to each Kubernetes machine and a VirtualBox virtual interface vboxnet:
vboxnet0 virtual iface: 192.168.25.XXX/24
VirtualBox creates the necessary routes and the vboxnet0 interface:
1
2
3
4
5
6
7
8
> route
Kernel IP routing table
Destination     Gateway         Genmask         Flags Metric Ref    Use Iface
default         Kitto2k         0.0.0.0         UG    0      0        0 eth0
link-local      0.0.0.0         255.255.0.0     U     1000   0        0 eth0
172.27.160.0    0.0.0.0         255.255.240.0   U     0      0        0 eth0
192.168.25.0    0.0.0.0         255.255.255.0   U     0      0        0 vboxnet0
192.168.100.0   0.0.0.0         255.255.255.0   U     100    0        0 eth0
Applications published using a Kubernetes NodePort will be available at all the IPs assigned to the Kubernetes servers. For example, for an application published at LoadBalancer Port 80 the following URLs will allow access from outside the Kubernetes cluster
See how to Publish an Application Outside the Kubernetes Cluster. Accessing the Kubernetes servers by ssh using those IPs is also possible.
1
2
3
4
5
$ ssh vagrant@192.168.25.XXX
vagrant@192.168.25.XXX's password: vagrant
Welcome to Ubuntu 20.04.3 LTS
...
Last login: Mon Feb 22 16:45:17 2024 from 10.0.2.2
8. Kubernetes HA Network Overview
General model for distributed cluster systems
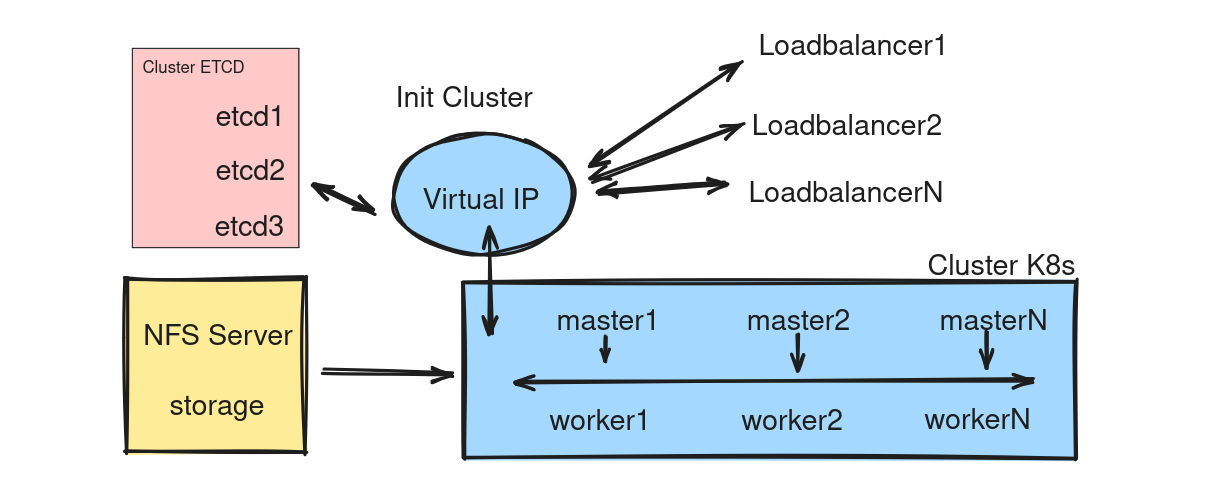
This lab section will be divided into several sections, single version can be applied.
The lab is using NFS as the disk storage for the entire cluster, and there are some other tools that will be updated and replaced.
8.1 Setup VIP

Using VIP increases the HA capability of the system when combined with haproxy, nginx or some other services.
1
ansible-playbook -i hosts playbook.yml --tags keepalived
Require install before: haproxy, nginx
8.2 Setup Certs
Gen Certs and Sync Certs if not exists certs for etcd and cluster
1
ansible-playbook -i hosts playbook.yml --tags gen-certs,sync-certs
Renew certs If update certs or loss certs
1
ansible-playbook -i hosts playbook.yml --tags renew-certs
Read more: Gen or Renew certs
8.3 Setup ETCD
Require sync certs before run ansible here. Run playbook to install etcd
1
ansible-playbook -i hosts playbook.yml --tags etcd-init
Note that: IF error certs, let’s remove certs old and sync certs new and restart systemd
Let’s deploy etcd cluster with pods run command line here
1
ansible-playbook -i hosts playbook.yml --tags etcd-in
Let’s deploy etcd cluster with systemd run command line here
1
ansible-playbook -i hosts playbook.yml --tags etcd-out
8.4 Init Cluster
Read more: Kubernetes Token
1
ansible-playbook -i inventory/hosts.ini playbook.yml --tags k8s-init
8.5 Join Master Node
1
ansible-playbook -i hosts playbook.yml --tags join-master
8.6 Join Worker Node
1
ansible-playbook -i hosts playbook.yml --tags join-worker
8.7 Setup CNI
Choose type cni for cluster
1
2
3
cni-calico: --tags cni-calico
cni-flannel: --tags cni-flannel
cni-cilium: --tags cni-cilium
8.8 Setup Ingress
Architecture Ingress Nginx Controller in Kubernetes
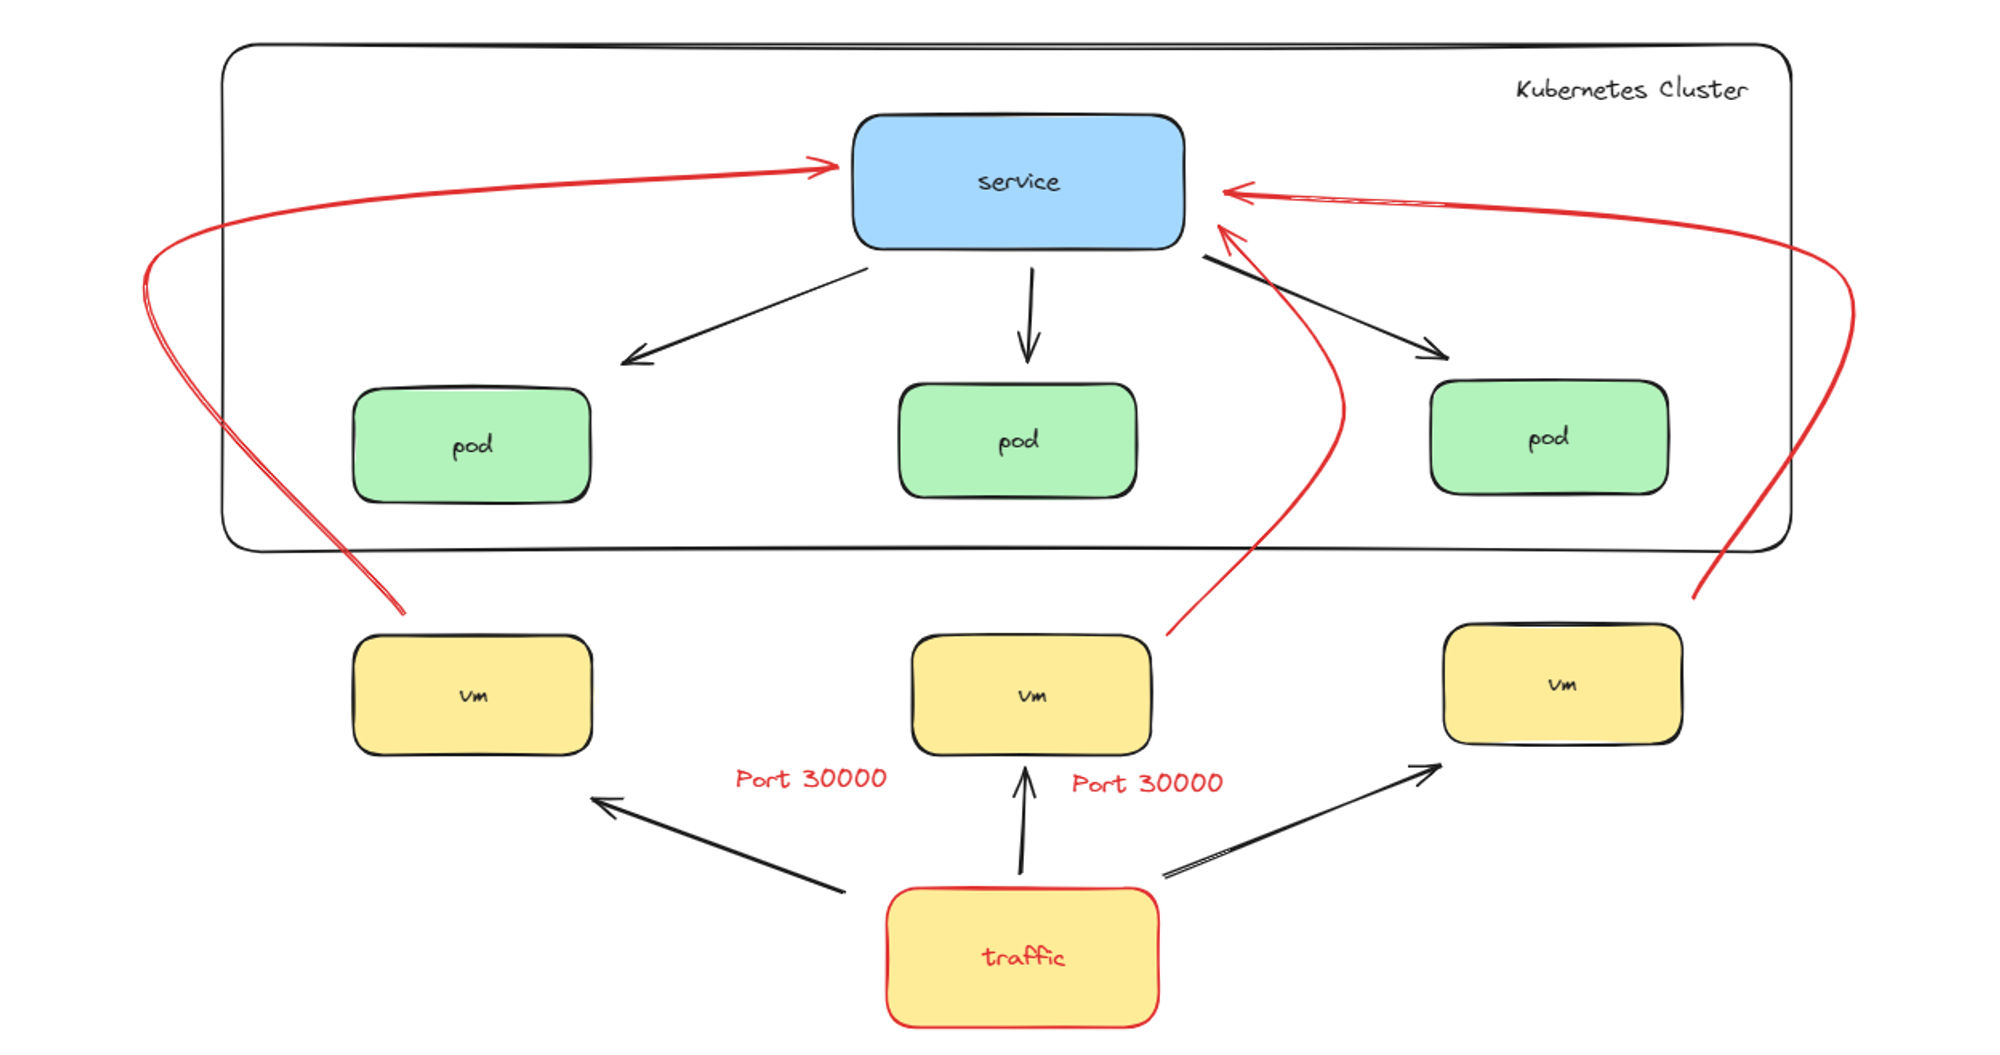
Run ansible with tags or read more refer: Ingress Nginx Controller
1
ansible-playbook -i hosts playbook.yml --tags ingress-nginx
8.9 Setup NFS
Need to modify variables first before run playbook with tags
1
ansible-playbook -i hosts playbook.yml --tags nfs,k8s-nfs
Read more: NFS
8.10 Setup Longhorn
Need to modify variables first before run playbook with tags
1
ansible-playbook -i hosts playbook.yml --tags k8s-longhorn
Read more: Longhorn
8.11 Setup Velero
Now, upate yet!!!
1
ansible-playbook -i hosts playbook.yml --tags k8s-velero
9. Result Output Ansible
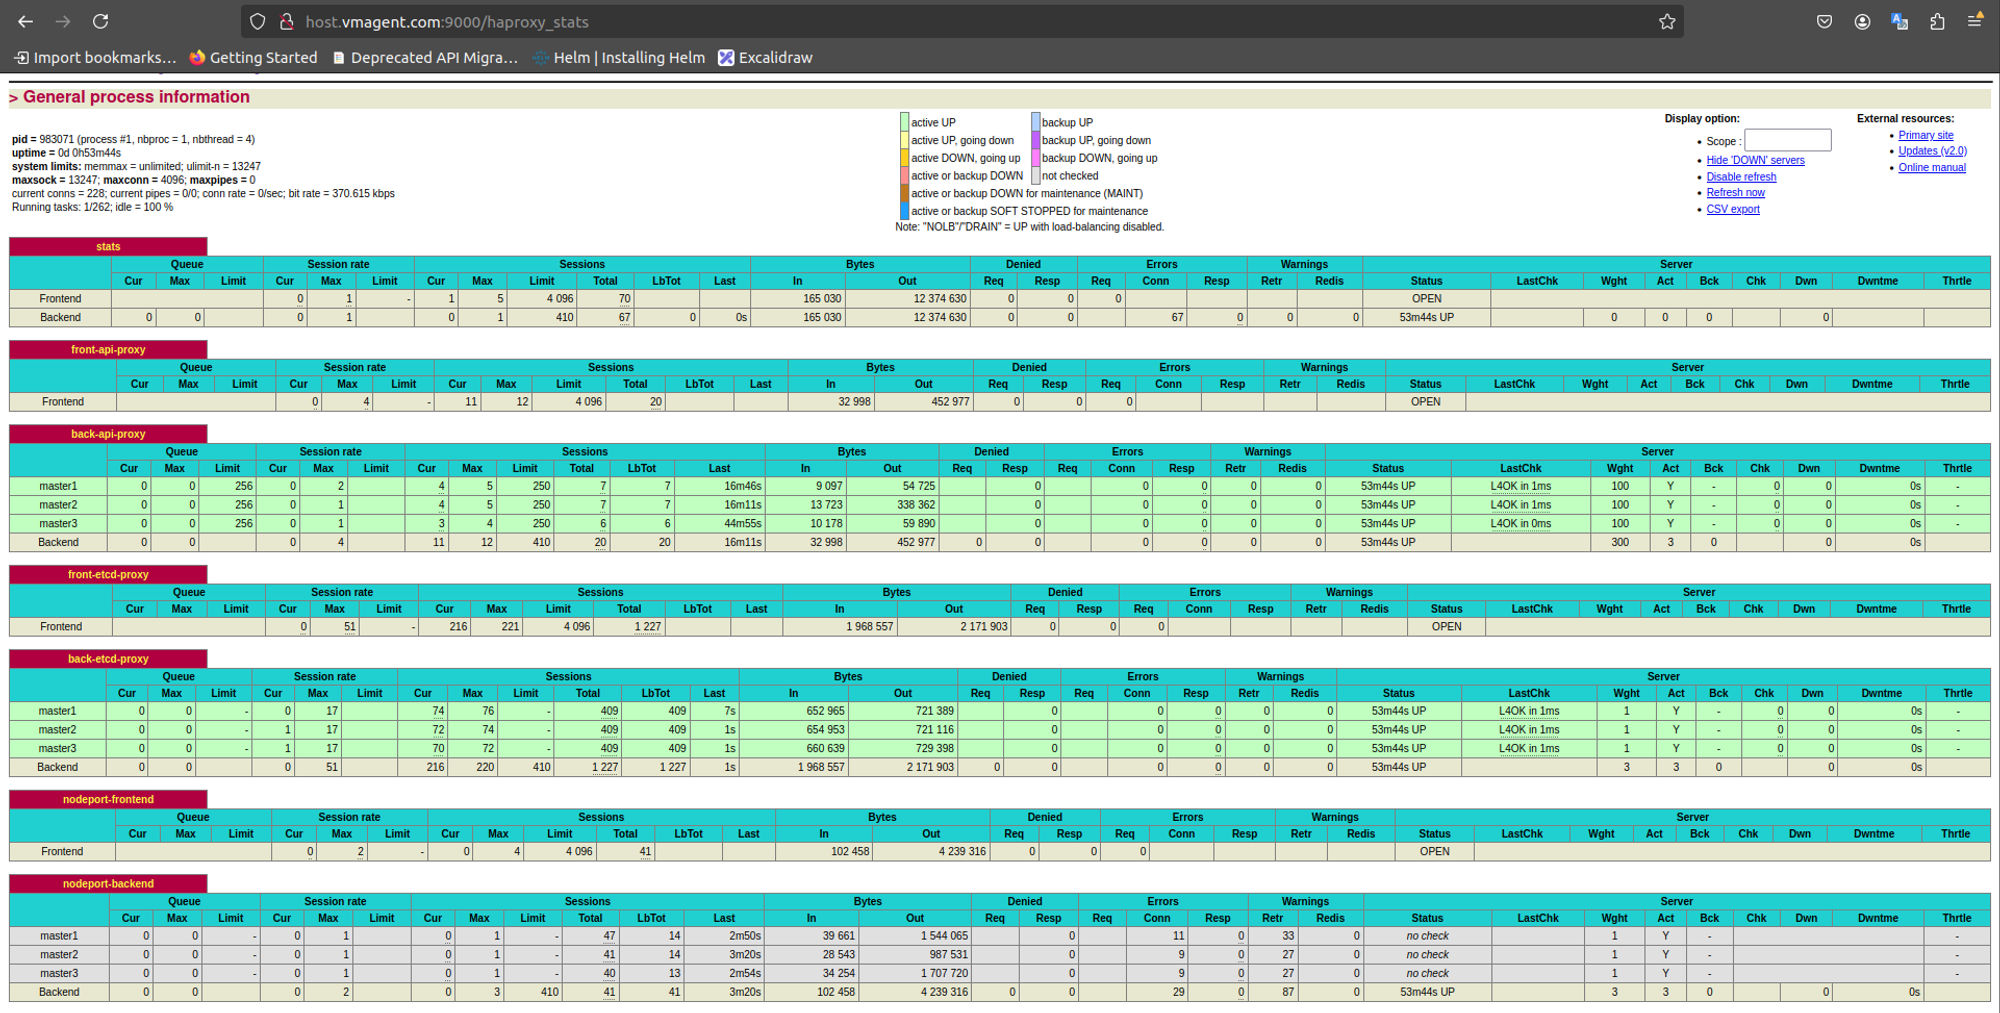
9.1 Dashboard HAproxy
- Login Chrome: *:9000/haproxy_stats
- Hint: [username/password]
9.2 Check ETCD
Check connect on Loadbalancer and try output via command
1
2
3
4
5
6
ETCDCTL_API=3 etcdctl \
  --endpoints=https://127.0.0.1:2379 \
  --cacert=/tmp/etcd/ca.pem \
  --cert=/tmp/etcd/etcd.pem \
  --key=/tmp/etcd/etcd-key.pem \
  member list -w=table
1
2
3
... member list -w=table
... endpoint status -w=table --cluster
... endpoint health -w=table --cluster
More ETCD: Refer
9.3 Check Health Kubernetes
Copy file config master to local machine and exports
1
export KUBECONFIG=~/.kube/config
Check Node and Pods
1
2
3
4
5
6
7
8
kubectl get node
NAME      STATUS   ROLES           AGE     VERSION
master1   Ready    control-plane   7d23h   v1.28.10
master2   Ready    control-plane   7d23h   v1.28.10
master3   Ready    control-plane   7d23h   v1.28.10
worker1   Ready    <none>          7d23h   v1.28.10
worker2   Ready    <none>          7d23h   v1.28.10
worker3   Ready    <none>          7d23h   v1.28.10
9.4 Check Ingress Nginx
1, Deploy image nginx and exposing Your Nginx Service to Public Network
1
2
kubectl create deployment nginx --image=nginx
kubectl create service loadbalancer nginx --tcp=80:80
2, Check service
1
2
3
kubectl get svc
NAME         TYPE           CLUSTER-IP      EXTERNAL-IP     PORT(S)        AGE
nginx        LoadBalancer   10.96.163.143   192.168.25.201  80:31451/TCP   106s
3, Checking result
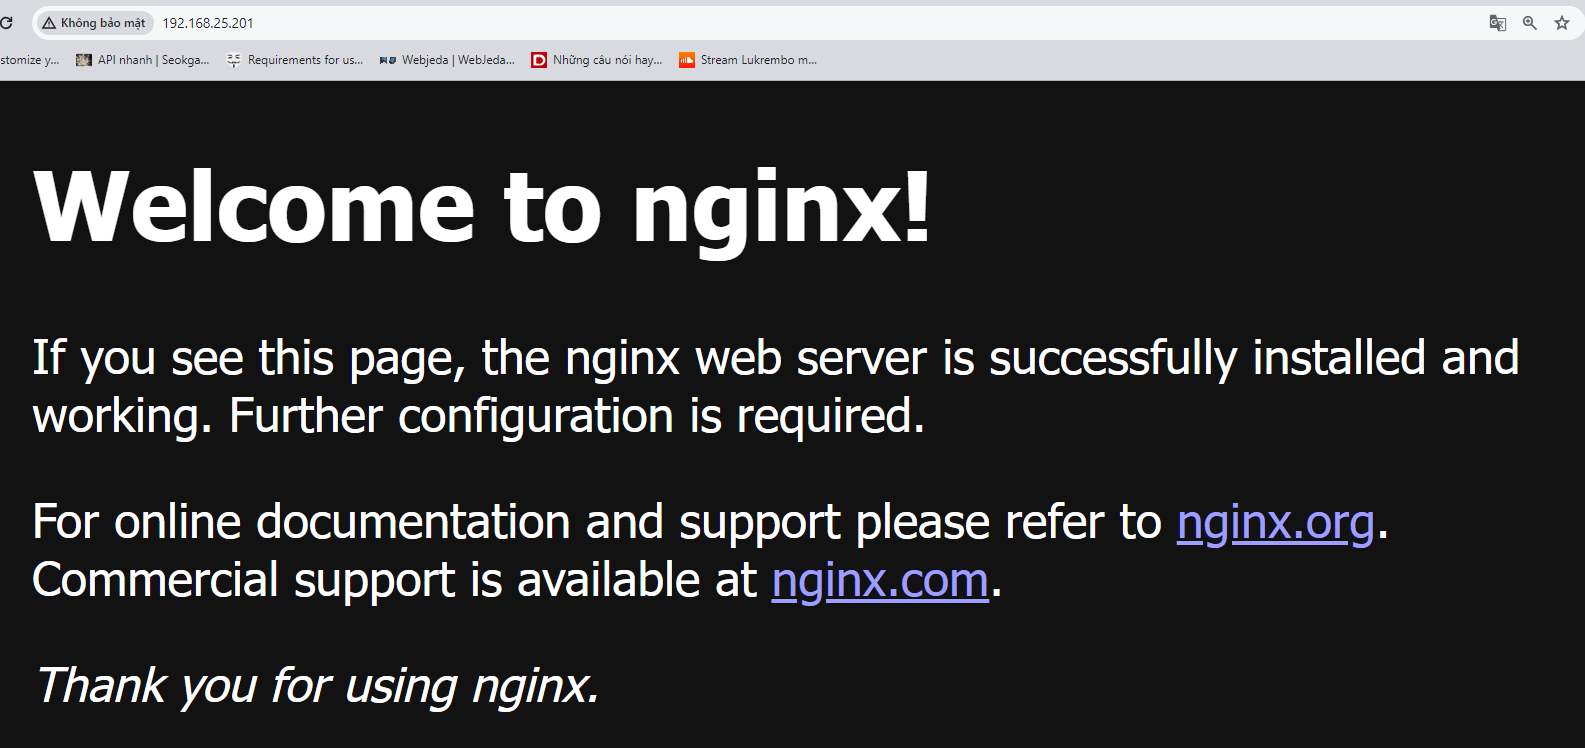
Note that: LoadBalancer type is only supported if your Cloud Provider supports it, also with bare-metal version you can use MetalLB.
To install mettallb with ansible-playbook. Let’s modify variable addresses and run command line
1
ansible-playbook -i hosts playbook.yml --tags metallb
9.5 Setup NFS
Connect to NFS Server
1
2
3
showmount -e
===> result success
/mnt/nfs/promdata Range_IP_Worker
Connect to NFS Client
1
2
3
sudo mount | grep promdata
===> results
<IP_Server>:/mnt/nfs/promdata on /mnt/nfs/promdata type nfs4 (rw,relatime,vers=4.2,rsize=524288,wsize=524288,namlen=255,hard,proto=tcp,timeo=600,retrans=2,sec=sys,clientaddr=Client_IP,local_lock=none,addr=Server_IP)
9.6 Setup Longhorn
Update yet!!! pending…

10. Monitoring
1
git submodule update --init --recursive
Note that: If modify context, let’s roll back
1
2
3
4
cd roles/Cloud-Metrics
git checkout .
git submodule update --recursive
cd ../..
Read more: How to Monitoring System Cluster
11. Uninstall LAB
1
ansible-playbook -i hosts playbook.yml --tags uninstall-kubernetes
Remove virtual if using vagrant or terraform
1
vagrant destroy -f
References
- Thanks for reading my blogs: Give me coffee
- Deploy MongoDB as a StatefulSet and monitor with Percona
Comments powered by Disqus.